Building OpenCV 4 with Java Support
OpenCV is a powerfull open source Computer Vision library written mainly in C++. Today, the most common way to use OpenCV from Java is to use its Java bindings. Technically, those bindings rely on the traditional JNI approach.

OpenCV offers ‘official’ distributions for Windows, iOS and Android but none for Linux and macOS.
This ‘how-to’ explains how to build the latest version of OpenCV (4.2+) with its Java JNI bindings on Linux and macOS.
❕A follow-up article will detail how to use OpenCV with the Java Module System, ex. how to package ‘OpenCV modules’ as Java Modules, how to use jmod and jlink, etc.
The latest Java version, 14 at the time of writing, is used as all the OpenCV Java material seems to be stuck on Java 8 (and OpenCV 3). The latest and greatest OpenCV and Java versions are used but this obviously work using different versions. Producing builds on Windows is just a matter of properly installing and configuring the native toolchain, and configure the respective Java paths.
Panama is an OpenJDK project whose goal is to improve and enrich the connections between the JVM and well-defined “foreign”, i.e. non-Java APIs. Panama is under active development, its current focus is on C but C++ support should be added later. It will then be worthwhile to revisit this and use Panama’s approach instead of the old JNI approach.
Building OpenCV and its Java bindings is straight forward but it takes time! The bulk of the time is spent in building natively OpenCV for the target platform, then the Java bindings will be built for that same platform. To do this, we need a native C++ toolchain (g++, ld, make, …) and a Java toolchain, i.e. a JDK and a recent version of Apache Ant.
Install the native C++ toolchain
Unless you are using a stripped down Linux distribution, most of the native tools are probably already installed (ex. ld, nm, objcopy, objdump, make, etc.). On a fresh Ubuntu, I only had to install g++ and cmake. Optionally and given that there are over 300 options to build OpenCV, using a configuration front-end such as ccmake or cmake-gui can be helpful. Note that Python is also required for the build phase.
sudo apt install g++
sudo apt install cmake
sudo apt install cmake-curses-gui
On macOS, you will need to have XCode installed.
Install the Java toolchain
Install the JDK, e.g. on Linux…
wget https://download.java.net/java/GA/jdk14/076bab302c7b4508975440c56f6cc26a/36/GPL/openjdk-14_linux-x64_bin.tar.gz
gzip -d openjdk-14_linux-x64_bin.tar.gz
sudo mkdir /usr/lib/jvm
sudo cp -r jdk-14/ /usr/lib/jvm/
sudo update-alternatives --install "/usr/bin/java" "java" "/usr/lib/jvm/jdk-14/bin/java" 1
sudo update-alternatives --install "/usr/bin/javac" "javac" "/usr/lib/jvm/jdk-14/bin/javac" 1
… and Apache Ant.
sudo snap install ant --classic
Configure the build
mkdir workspace;cd workspace
git clone https://github.com/opencv/opencv.git
mkdir build
Using ccmake, create the build files and point it to the OpenCV codebase directory and to the newly created build directory.
ccmake -S opencv/ -B build/
Alternatively, you can use cmake-gui which offers a GUI. Simillarly, you should specify the OpenCV codebase location and the directory where it should be build.
Both ccmake and cmake-gui works the same way. You first need to hit “C” (configure) to scan your envorinoment, this will scan your environment and configure related entries (ex. compilers location, Java paths, supported hardware extensions, …). Then and if required, you can manually configure some entries, just make sure to press “T” to toggle the advanced mode. Once done, you should press “G” to generate the Makfile.
Most of settings should be fine by default but if you have simply unpacked the JDK, cmake will not find the related paths so make sure they are correctly configured.
JAVA_AWT_INCLUDE_PATH
↪ Linux /usr/lib/jvm/jdk-14/include/
↪ macOS /Library/Java/JavaVirtualMachines/jdk-14.jdk/Contents/Home/include/
JAVA_AWT_LIBRARY
↪ Linux /usr/lib/jvm/jdk-14/lib/libjawt.so
↪ macOS /Library/Java/JavaVirtualMachines/jdk-14.jdk/Contents/Home/lib/libawt.dylib
JAVA_INCLUDE_PATH
↪ Linux /usr/lib/jvm/jdk-14/include/
↪ macOS /Library/Java/JavaVirtualMachines/jdk-14.jdk/Contents/Home/include/
JAVA_INCLUDE_PATH2
↪ Linux /usr/lib/jvm/jdk-14/include/linux/
↪ macOS /Library/Java/JavaVirtualMachines/jdk-14.jdk/Contents/Home/include/darwin/
JAVA_JVM_LIBRARY
↪ Linux /usr/lib/jvm/jdk-14/lib/server/libjvm.so
↪ macOS /Library/Java/JavaVirtualMachines/jdk-14.jdk/Contents/Home/lib/server/libjvm.dylib
💡 Building OpenCV takes time, anywhere between 5 minutes and +60 minutes depending on your configuration, the selected OpenCV modules and options, …; so it’s a good idea to first do a minimal build to check that eveything is OK.
To reduce the build time, disable the following entries:
-
BUILD_IPP_IW -
BUILD_ITT -
BUILD_OPENEXR -
BUILD_PERF_TESTS -
BUILD_TESTS -
BUILD_TIFF -
BUILD_WEBP -
BUILD_opencv_calib3d -
BUILD_opencv_dnn -
BUILD_opencv_features2d -
BUILD_opencv_flann -
BUILD_opencv_gapi -
BUILD_opencv_highgui -
BUILD_opencv_ml -
BUILD_opencv_objdetect -
BUILD_opencv_photo -
BUILD_opencv_python_bindings_generator -
BUILD_opencv_python_tests -
BUILD_opencv_stitching -
BUILD_opencv_ts -
BUILD_opencv_video -
BUILD_opencv_videoio -
VIDEOIO_ENABLE_PLUGINS -
VIDEOIO_ENABLE_STRICT_PLUGIN_CHECK
The sample below uses OpenCV’s PNG suport so make sure to keep WITH_PNG enabled and unselect all others WIDTH_* entries.
Disabling those options will reduce the build time from ~50 minutes to ~5 minutes (YMMV!). Once your build process is OK, you can selectevely re-enable the features you plan to use. And realistically, you will need additional modules and features (dnn, features2d, objdetect, …) to unleash the power of OpenCV!
The following OpenCV modules are the bare minimum to use OpenCV from Java.
-
BUILD_opencv_core -
BUILD_opencv_imgcodecs -
BUILD_opencv_imgproc -
BUILD_JAVA -
BUILD_opencv_java -
BUILD_opencv_java_bindings_gen
Once you are your have configured the entries, just press “G” to generate the Makefile.
Build OpenCV
cmake --build build/ or make --directory=build/
To use OpenCV from Java, you need the build/bin/opencv-430.jar jar and the native libraries located in build/lib.
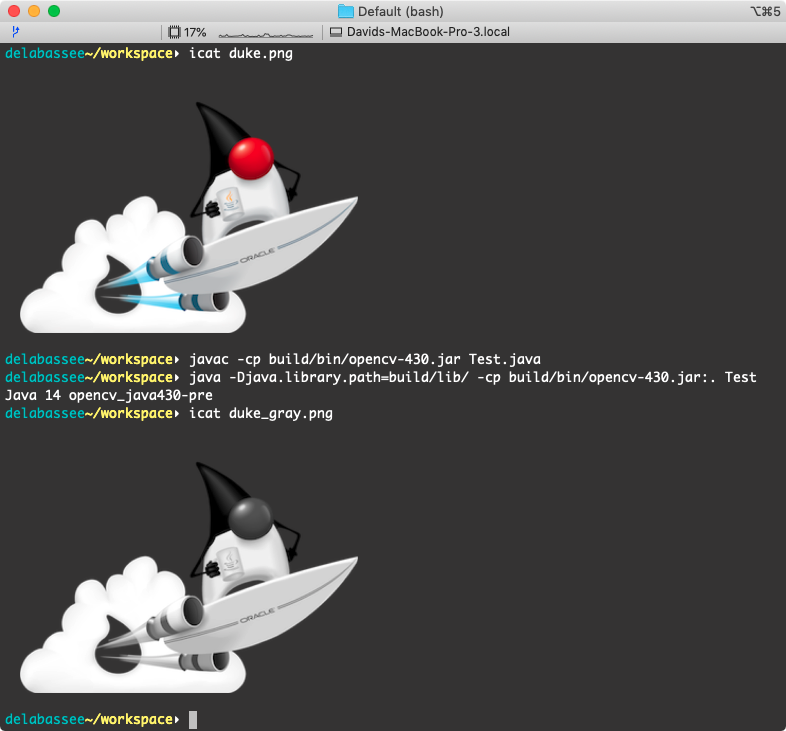
This basic Test class converts a picture from the default BGR colorspace to gray.
import org.opencv.core.*;
import org.opencv.imgcodecs.Imgcodecs;
import org.opencv.imgproc.Imgproc;
...

public class Test {
  public static void main(String[] args) {

    System.loadLibrary(Core.NATIVE_LIBRARY_NAME);

    var srcImage = Imgcodecs.imread("duke.png", Imgcodecs.IMREAD_UNCHANGED);

    List<Mat> channels = new ArrayList<>();
    Core.split(srcImage, channels);
    var chAlpha = channels.get(3); // 4th channel = Alpha

    Imgproc.cvtColor(srcImage, srcImage, Imgproc.COLOR_BGRA2GRAY);

    List<Mat> greyChannel = new ArrayList<>();
    Core.split(srcImage, greyChannel);
    var chGray = greyChannel.get(0);

    Mat grayDuke = new Mat();
    var listMat = Arrays.asList(chGray, chGray, chGray, chAlpha); // 3 channels + Alpha
    Core.merge(listMat, grayDuke);

    Imgcodecs.imwrite("duke_gray.png", grayDuke);

    }
}
Run it…
javac -cp build/bin/opencv-430.jar Test.java
java -Djava.library.path=build/lib/ -cp build/bin/opencv-430.jar:. Test

And now, you can re-enable the OpenCV features that you plan to use, and produce a new build…